
Let it Snow Scroll Saw Pattern
Well, it’s mid-December already. Thanksgiving has come and gone and before you know it, Christmas day will be here. Usually, by this time of year, I have created a pretty healthy collection of freshly cut Christmas ornaments and decorations and then either sold or given them as gifts.
One of the projects that I have recently done was a batch of holiday word art decorations by using a scroll saw pattern called “Let it Snow” by Steve Good.
The Let it Snow scroll saw pattern is fairly easy to cut out and because of its simplicity, it is a fun project for both new and more seasoned scrollers alike.
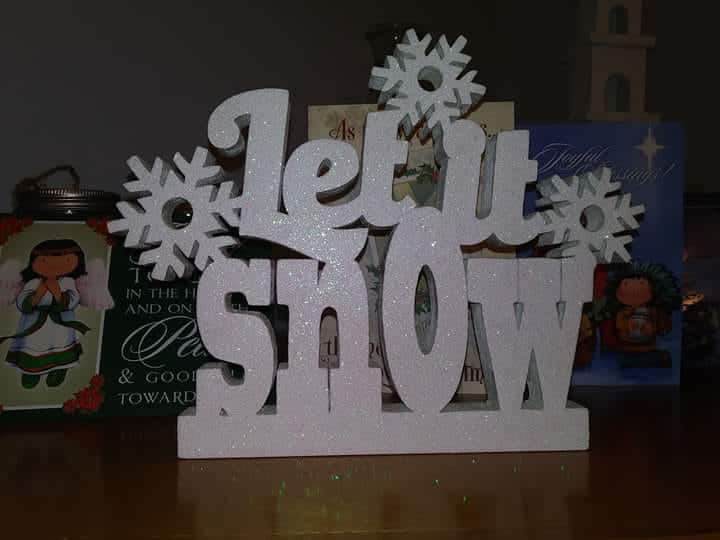
The way I do this project is especially attractive to me since it does not require much sanding. The reason for this is that I spray paint it and then apply a layer of extra fine crystal diamond glitter to it.
Stock Used
I have made this project with walnut and cherry in the past, but since they were not painted white, they just didn’t have the Christmas look to them.
Since this project will be painted white, I like to use poplar. I have also made these using pine and even a few with maple but they were just leftover scrap pieces. Being hardwood, I think poplar and maple would hold up much better in the long run.
You could use other wood such as cherry or oak however, painting cherry or oak just seems wrong to me.
Another option would be plywood or MDF if you have some available. I actually never did this project using plywood or MDF. If you have done this let us know how it worked out in the comments.

Blade Selection
Most of the time I use 3/4 thick stock. I have used several blade types including Olen MS3, Pegas #3, and #5 Modified Geometry. My favorite blade for this project has been the Pegas #3 modified geometry.
The reason is because I tend to go pretty fast on this one and there are a lot of tight turns on the snowflakes. The Pegas #3 Modified Geometry seems to do much better on these turns so I can get through them quicker.
Also, there are a few tiny internal cuts on this project that you will have to use a #3 or smaller small blade to do anyway. I usually start with those to get them out of the way. There are only 13 internal cuts for this project.

I do all the internal cuts first and then tackle the exterior. The internal cuts can take me around 15 minutes or so to complete. The exterior cuts account for the majority of the time it takes when cutting out this project.
I am not a very fast scroller so it takes me about an hour to an hour and a half to completely cut out this project.

Finishing Steps
Step 1
Once this project is cut out, I usually just do a quick, light sanding just to get the fuzzies off. I don’t spend very much time at all. Usually, less than 2 minutes to do any touch-up sanding. This is why I like this project so much.
Step 2
I then take the project and drive a long drywall screw into the bottom center so that I can hold it kind of like a big lollypop. This makes it much easier to handle while painting.

After sanding I take the project outside and spray it with several coats of Rust-Oleum American Accents Ultra Cover 2X Ultimate High Gloss White Spray Paint and Primer.
Make sure that you get all the internal cuts completely covered with paint. If you miss any spots they will be very noticeable on the finished project since it will be painted gloss white.

After the project is sufficiently covered, I then take it out for one last coat making sure that all of it has some fresh paint.
While the paint is wet I have a workstation already setup with some wax paper laid out flat on the table where I perform the next step. Applying the glitter.
Step 3
Holding the project by the screw, take the bottle of Sulyn Extra Fine Crystal Diamond Glitter and sprinkle generously over the entire project except for the bottom. Make sure to get it inside each of the internal cuts as well. This gives the project the look of freshly fallen snow.

Once this is completed gently tap it a few times to shake off any excess that is not stuck to the paint. I usually then hang it upside down and let it dry.

Step 4
Once dry, look to make sure you didn’t miss any areas. If you did miss a few spots, don’t worry too much. You can apply a little shot of the Rust-Oleum Specialty Glitter Sealer and then apply some glitter to the area. Just make sure to allow the glitter to fall onto the project to make it look natural.
If you are happy with the project, you can apply some Rust-Oleum Specialty Glitter Sealer to the entire project to seal it and let dry.
Additional Materials Used


Where to get the Pattern
The Let it Snow scroll saw pattern is freely available from Steve Good’s pattern catalog:
http://www.stevedgood.com/letitsnow.pdf
For thousands of free scroll saw patterns visit Steve Good’s pattern catalog and website at:
https://www.stevedgood.com/catalog/
http://scrollsawworkshop.blogspot.com/.
Conclusion

The Let it Snow scroll saw pattern is a fun and fairly quick Christmas project that you can do in just a few hours. They seem to be popular and would be great to sell at craft shows or to use as Christmas gifts.
I hope this has been helpful and you have enjoyed your visit. Let us know if you have any questions in the comments section below.
While you are here, check out some of our other pages for information on:
Scroll Saw Patterns
Scroll Saw Blades
Tips and Tricks
Scroll Saw Websites
Resources
Subscribe to our blog and we will notify you by email whenever a new article is posted.
Thank You and Keep on Scrolling
One thought on “Let it Snow Scroll Saw Pattern”
I love looking through a post that can make people think. Also, many thanks for permitting me to comment!